
How we plan and follow our route for Alaska to Patagonia.
Among the questions we are most frequently asked are ‘How do you navigate?’ and ‘How do you find remote roads and tracks?’.
This article provides an overview of our route planning methods for our Alaska to Patagonia bikepacking tour as well as the navigation apps and devices we use to stay on route and out of trouble.
Back in 2011 Hana and I departed Chengdu in South West China for a 13,000 km cycle tour that would take us over multiple 4000m passes on the Tibetan Plateau, down into the tropical jungles of Laos and through Vietnam, Cambodia, Thailand, Malaysia and Sumatra. Smartphones were a relatively new thing then and buying one just for the trip was out of our budget. We’d planned our trip from a base in the UK, and our GPS was back in NZ so we did without that too, instead making do with some German Reise Know-How maps for most of the countries. For China we shopped locally, but the best map we could find for the Sichuan-Tibet highway was 1:1,000,000 and a lot of our other maps were only 1:600,000. For outdoors nerds from NZ used to 1:50,000 topographical maps these took a bit of getting used to!
Generally, even with our basic mapping we were seeking the route less travelled, and it was interesting to discover that the Reise maps sometimes showed roads that didn’t exist or didn’t show roads that did exist. Looking back, our methods of navigation and route planning were very restrictive: when the only options you have are what’s presented to you on an only marginally-accurate map you’re missing a big slice of potential adventure, and while Google Earth had been around a few years, its use to us was limited with no GPS.
Fast forward to 2017 and we can now carry a continent’s worth of extremely detailed maps in a single smartphone. File-sharing of routes between cyclists is commonplace and the availability of wifi has made route planning something that can be done accurately and on a whim as travel intentions change. The adoption of this technology by adventure cyclists has opened up a new world of cycling opportunity beyond that presented by traditional maps.

Navigation Overview
Our favourite navigation apps and methods have changed during our Alaska to Patagonia ride depending on the type of mapping data that has been available.
From the get go up in Alaska until the USA-Mexico border we used Back Country Navigator (BCN) (Android) with the CalTopo (1:24,000) map set. Although this particular series is no longer being updated, these raster-based maps are great if you have come from a background of using paper topographical maps. A huge amount of information is contained in these maps, including roads old and new and the features of the landscape in detail, with easy to read contour lines and elevations. As an example we found these topo maps really useful for planning camping and water resupply as every single creek, pond, reservoir and well is shown. Other navigational aids such as aerials, fences and structures are present too. BCN takes some figuring out the first time you use it, but it gives you helpful text pointers as you go and is a powerful and robust app for all things navigation including following GPX tracks, exporting recorded GPX tracks and creating waypoints.
Supplementing BCN for Alaska and Canada we had the Milepost app (Android & iOS) on our iPad. Built for motorists, Milepost is a digi-tome of detailed information for the highways, including all resupply locations, official and unofficial camp sites. The only paper maps we used were the Adventure Cycling Association’s brilliant maps for the Great Divide, which detail food and water resupply, accommodation and camping, route profiles and mileages.
We also carried the GDMBR guidebook on our Kindle which was great for an evening preview of the following day’s ride, logistics and other general information such as trail history.
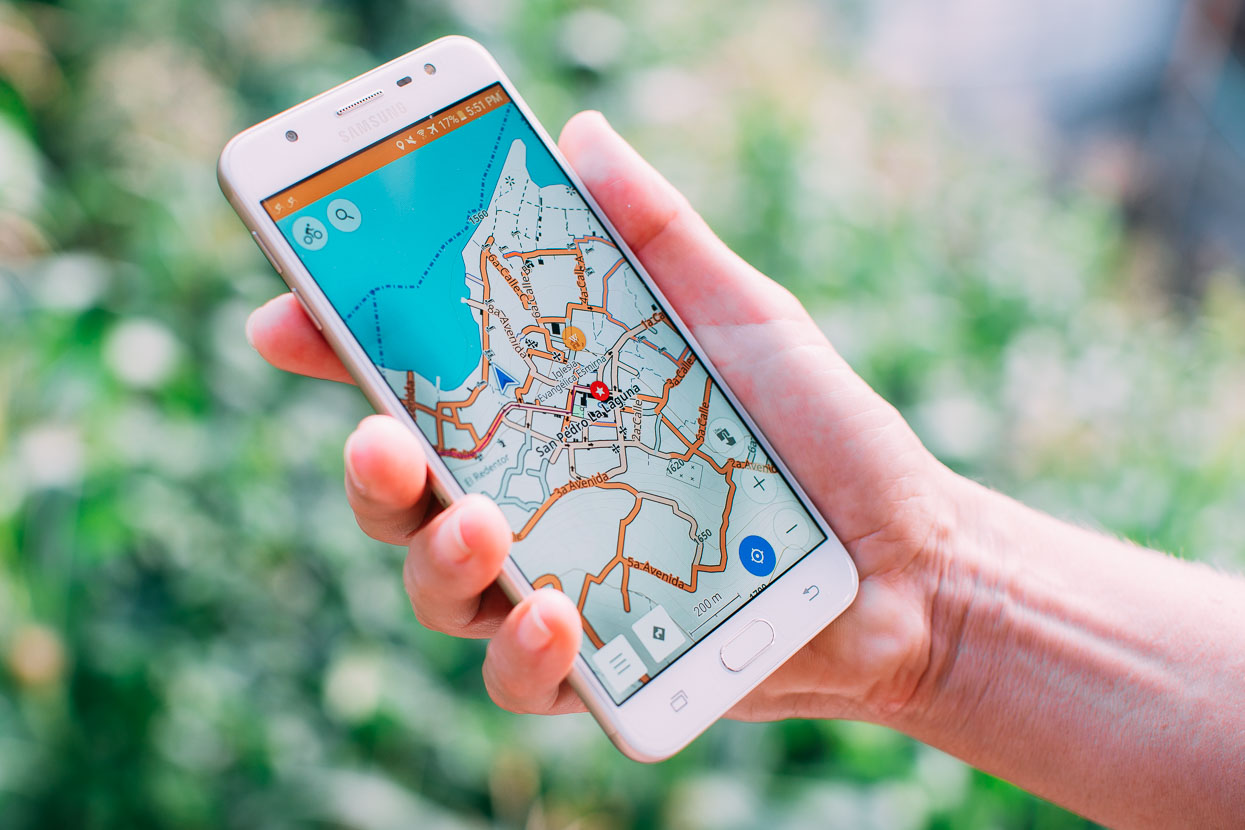
From Mexico south our go-to app for daily navigation, including measuring distance to locations and elevation/landscape assessment has been OsmAnd+ (Android & iOS). The main reason we switched to this is that we did not like the topo maps for Mexico and Central America that were available for Backcountry Navigator, as much as we love the BCN app. OsmAnd’s Open Street Map vector-based maps take up much less memory and the app is both highly configurable and feature packed. Something that I like about OsmAnd is that the contour lines and map detail is very easy to read.
OsmAnd is an increasingly powerful tool and extra functionality is added via plug ins: we use the contour lines plug in as well as downloading ‘hill shades’ for really clear topo maps, but you can also download complete Wikipedia text for POIs (super useful while travelling) and plug ins for GPX editing and trip recording. It also has routing (like Google Maps) so you can easily navigate on the fly into a city. The ‘navigate along track’ function is also very useful for calculating distance to a particular point along your preloaded GPX track, as well as providing detailed elevation and percentage profiles. It’s also easy to set ‘splits’ along a preloaded GPX track in say, 2 kilometre segments, for at-a-glance distance checking.
Generally for navigation in cities and big towns we also have the relevant section of map for Google Maps. Google tends to show more POIs, which makes finding a hotel or campsite at the end of a long day easier.
While our phones are Android, until Colombia Hana carried an iPad with MapOut (iOS) installed and liked using it for pre-ride planning, usually in the evenings. With our current pre-planned GPX track installed, it’s the best tool we’ve used yet for fast distance measurement (say town to town) and for elevation profiles. It uses Open Street Maps, but with a nice topomap style rendering and the maps are a relatively small download. For iPhone or iPad users, this app is a very good option.
We have also carried paper maps for Mexico and Central America (posted ahead to save weight) from the National Geographic Adventure Travel Map series, as a backup in case of electronic failure and for planning overview. These are very nice maps that vary significantly in scale (from 1:2,000,000 to 1:400,000) but even at the smallest scale, for us they are really only useful as an overview map for route planning as they don’t show many of the back roads and tracks. However for main road-only cycle tourists they might be all you need. We would not bother with them again.
Another map set we carried on our iPad for Mexico (via a tip from Scott Pauker), were the Mexican Government Secretaría de Comunicaciones y Transportes Maps which are reasonably detailed and come as a PDF for each state. There were a couple of times when these were very helpful. You can find them here.
Coverage – or detail – provided by digital maps varies a lot. The two heavyweights of digital mapping are Google Maps and Open Street Maps (OSM). Most likely one of these two mapping ‘engines’ will be what’s displayed on any mapping app you use, most likely OSM, because the data is free to use by anybody who wants to develop a mapping app. Google’s data is much more difficult for third parties to use.
For North America, except Mexico, OSM and Google Maps are fairly similar in detail but in some cases OSM is much more detailed. Because users can contribute to OSM, local areas and favourite biking spots are more likely to have been mapped by enthusiasts. Cross the border into Mexico and it’s the opposite and remained so through most of Central America, except for small pockets where OSM enthusiasts have mapped small areas, such a temples. Overall, for Mexico and Central America, Google Maps has significantly more minor roads, but in Colombia, Ecuador and Peru, OSM maps are more complete anywhere outside of cities.
Gaia GPS (Android & iOS) is another navigation heavyweight well worth mentioning. It has similar functionality to BCN, but has the benefit of cloud integration for route planning and downloading, and a useful feature whereby you can upload a GPX track to your device and download the map tiles you need only along that track. It’s more efficient than BCN’s tile download method, but we have steered away from it in Mexico and Central America because reliable (fast) internet is essential for the large tile downloads. OsmAnd works better for us overall in Latin America.
Our takeout after experimenting with a few different apps and map platforms is that there’s no one mapping solution to adopt if you want to give yourself the full range of options for route planning and navigation. It’s better to have a few tools in your box. We have had a couple of situations where ground reality did not match what we were seeing on maps, or expecting, and having an additional map to review gave us confidence to follow an unlikely looking line. In one case it was a matter of Garmin’s Earthmate Map (which we normally only use with our InReach) showing a track that none of our other maps did.
Route Planning
For most of Alaska and Canada alternative options to the highways and main roads are few: there just aren’t many roads to choose from. For the USA we followed the well mapped Great Divide MTB Route as far as Hachita, NM, before following a route of our own plotting west to San Diego. For the Baja Divide we were once again following the available GPX route and trail notes, as with the Great Divide.
But for all of ‘mainland’ Mexico, Guatemala, Honduras, most of Colombia and parts of Peru we have been following our own pre-planned routes. Generally we are looking for dirt roads and tracks but sections of pavement are of course unavoidable at times. Because we always look for back routes and secondary roads, those times when we do end up on pavement the roads are usually very quiet.
Preparing a Route
By the time we sit down to plan and prepare a route we’ve usually decided the key locations we want to see; for example interesting towns, national parks/reserves, mountain ranges and archeological sites.
Our current go-to for planning a GPX track to follow is to use Ride With GPS (desktop) which allows you to reference Google, OSM and satellite maps for planning and routing. It has a powerful and easy to use interface in the browser and is very good for route planning, allowing you to modify auto-routed routes and export as required. I particularly like that you can switch seamlessly between automatic routing while route planning, to drawing in a route (over a satellite map if need be) and back again.
Quite often in Latin America roads are missing from maps, or don’t join up. Using satellite maps enables us to fill in the gaps (if they exist) and consider all options, including hike-a-bike, to join two sections of road. Ride With GPS also has an app that integrates very well with the desktop/cloud based functionalities for downloading tracks you have created, although we find the app battery intensive and prefer to download the GPX we create to use in OsmAnd and our Garmin.
Once we’re roughly satisfied with the route we go over it in detail in satellite view, marking in useful resupply and possible water points as POIs. We also try to look out for gnarly surprises where the path has routed somewhere unridable. It pays to do this carefully. Sometimes you are just guessing what the surface might be like – but that’s part of the whole adventure right? Sometimes we’ll upload the track we’ve made to Google Earth to get another perspective of the terrain it covers. You can also use Google Earth’s pictures function to check for points of interest.
90 per cent of our riding time we follow (on phone or Garmin) a GPX track that we have created. We find pre-planning helps keep riding days flowing, when most of the navigation questions are taken off the table. It’s rare that we have to stop and study the map while stopped at a junction and can instead concentrate on photography, engaging with locals and enjoying the scenery. Of course there are times we deviate for whatever reason, but it’s good to have a plan to start with. It’s also much more battery efficient to follow a GPX track you have planned, rather than using a phone for auto-routing (i.e. following Google Map or OsmAnd directions on the go)
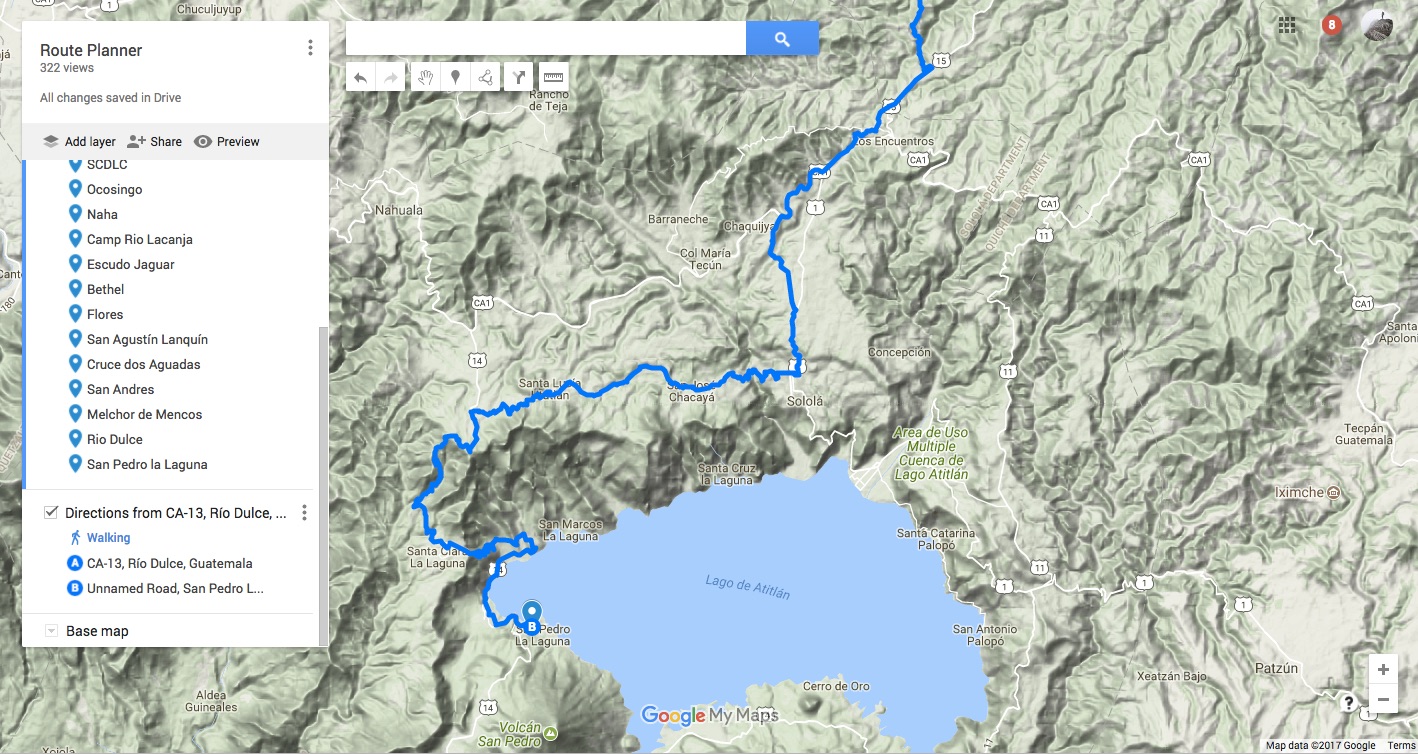
Previously we have also used Google My Maps (different to Google Maps – but the same map data) in our laptop browser to create a GPX file we can use in our phones or GPS. Firstly we set a start point and a final destination; this might be just two day’s worth of riding or it might be a week. We tend not to map larger chunks in a single file as they can get unwieldy.
We then use Google My Maps to create a ‘routing’, generally using ‘walking route’. Partly because ‘cycling route’ is not available in some countries, but also because the ‘walking’ option tends to create routes that are perfectly do-able by mountain bike, are fun to ride and take you through some interesting and remote places, usually linking tracks with dirt roads and pavement sections. For our ride through Mexico and Guatemala we used the walking route option extensively and it made possible routes you could never create simply by scanning Google Earth or looking at maps. Sometimes we have ridden local tracks and single track paths between villages that could never have been mapped officially – it’s still a mystery to as to how this information has made it into Google Maps.
The power of Google My Maps is not only in the ‘add directions’ tool, but the fact that these can be easily edited simply by clicking and dragging – that’s how we make sure any POIs we want to see are included in a route. We might also edit it to include resupply towns or to avoid a town completely.
For detailed Google My Map instructions, scroll to the end of the post.
Smartphone vs Handheld GPS
Since the start of our trip (2.5 years ago at time of writing) we’ve used both our Samsung phones and a Garmin eTrex 20x as our navigation devices. To dispel a couple of myths surrounding using mobiles phones for navigation:
(1) You don’t need a mobile signal. Most phones use both GPS (US) and Glonass (Russian) satellites for positioning, the same as a dedicated GPS unit such as a handheld Garmin. Recommended practice is to download maps while you have a wifi connection for use while offline. With pre downloaded or cached maps you don’t need any data coverage.
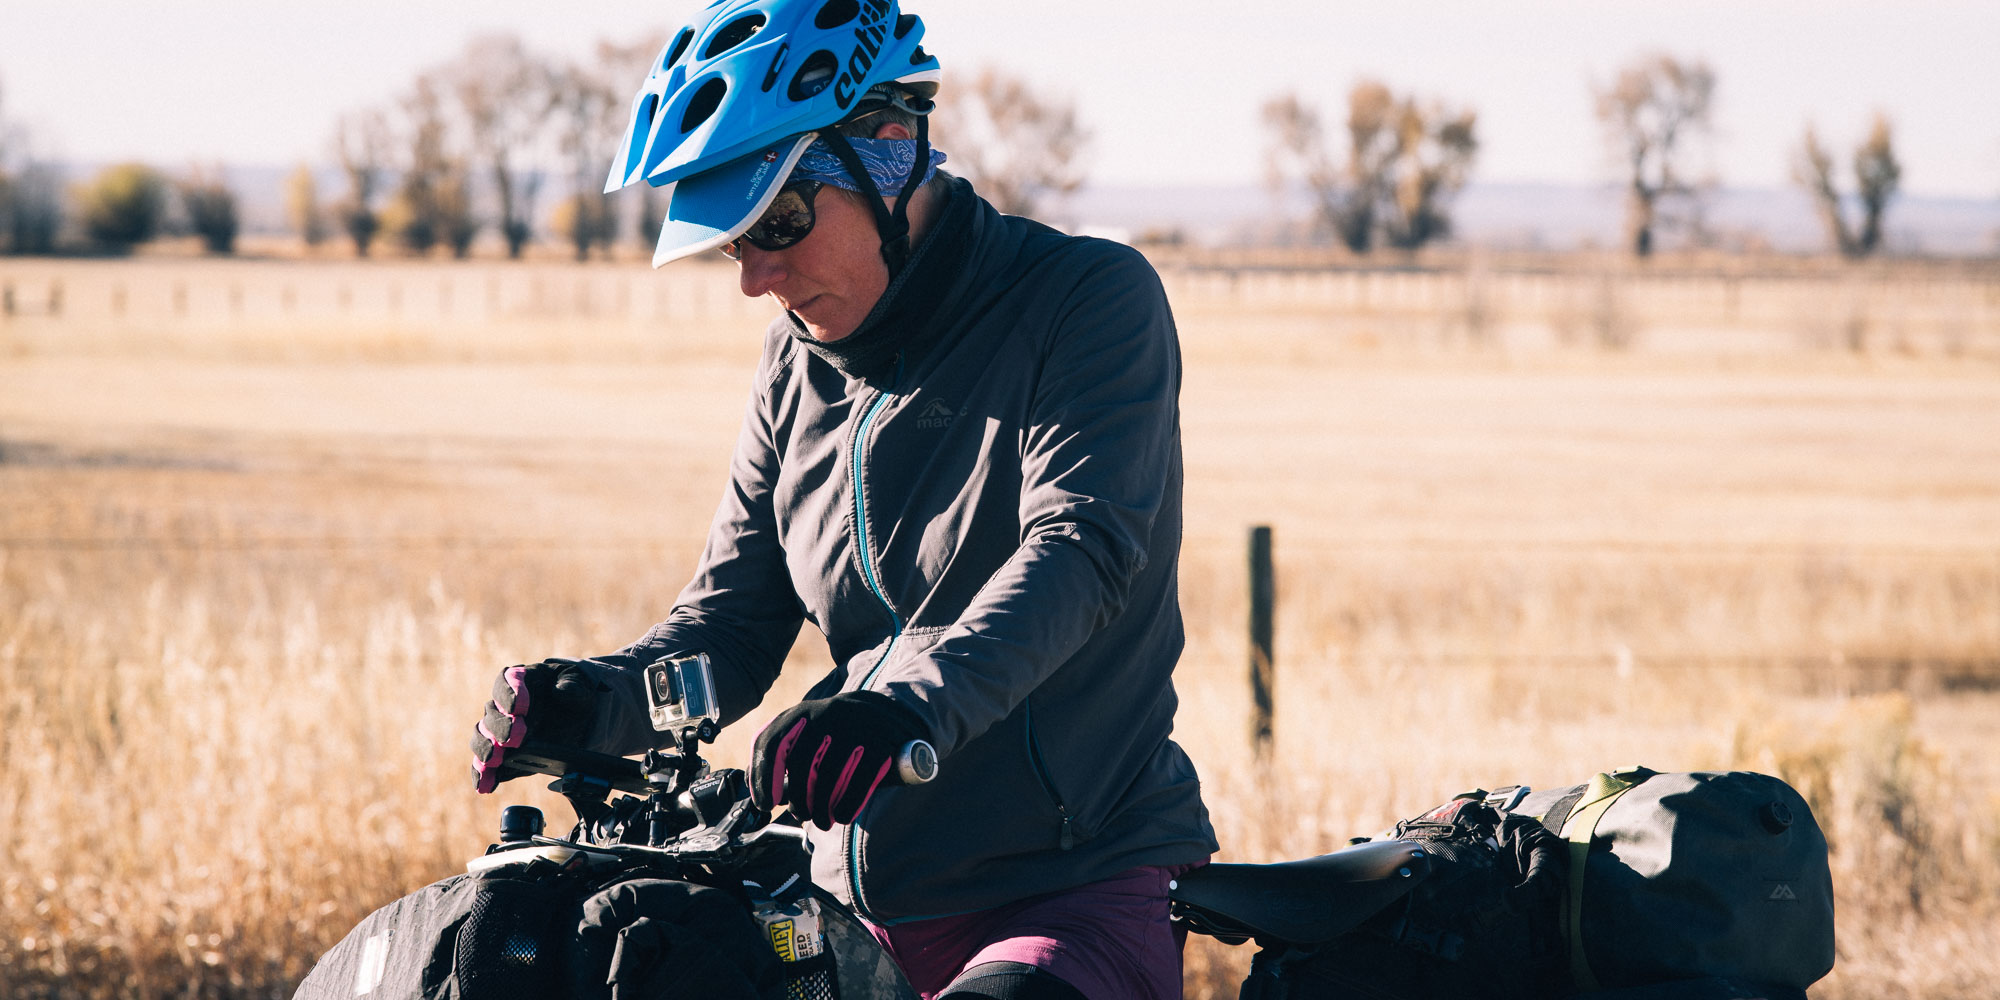
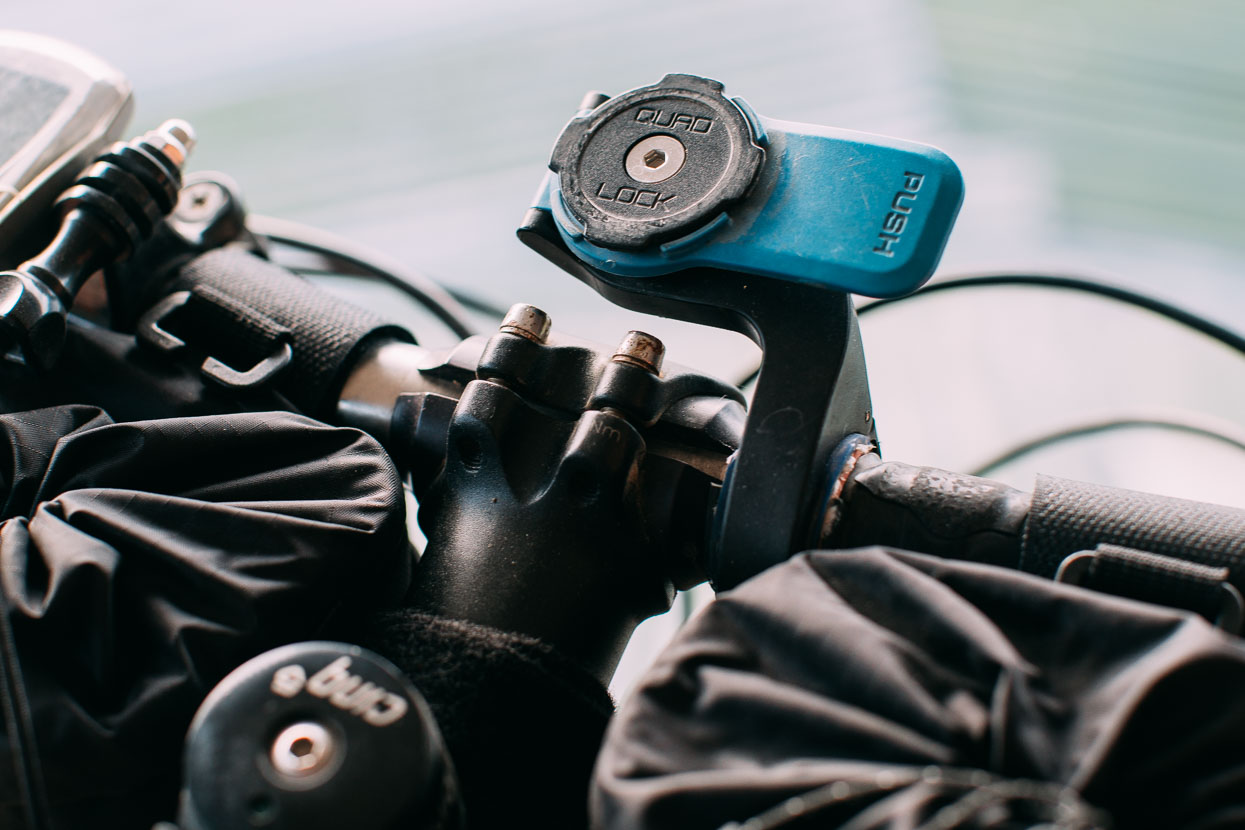
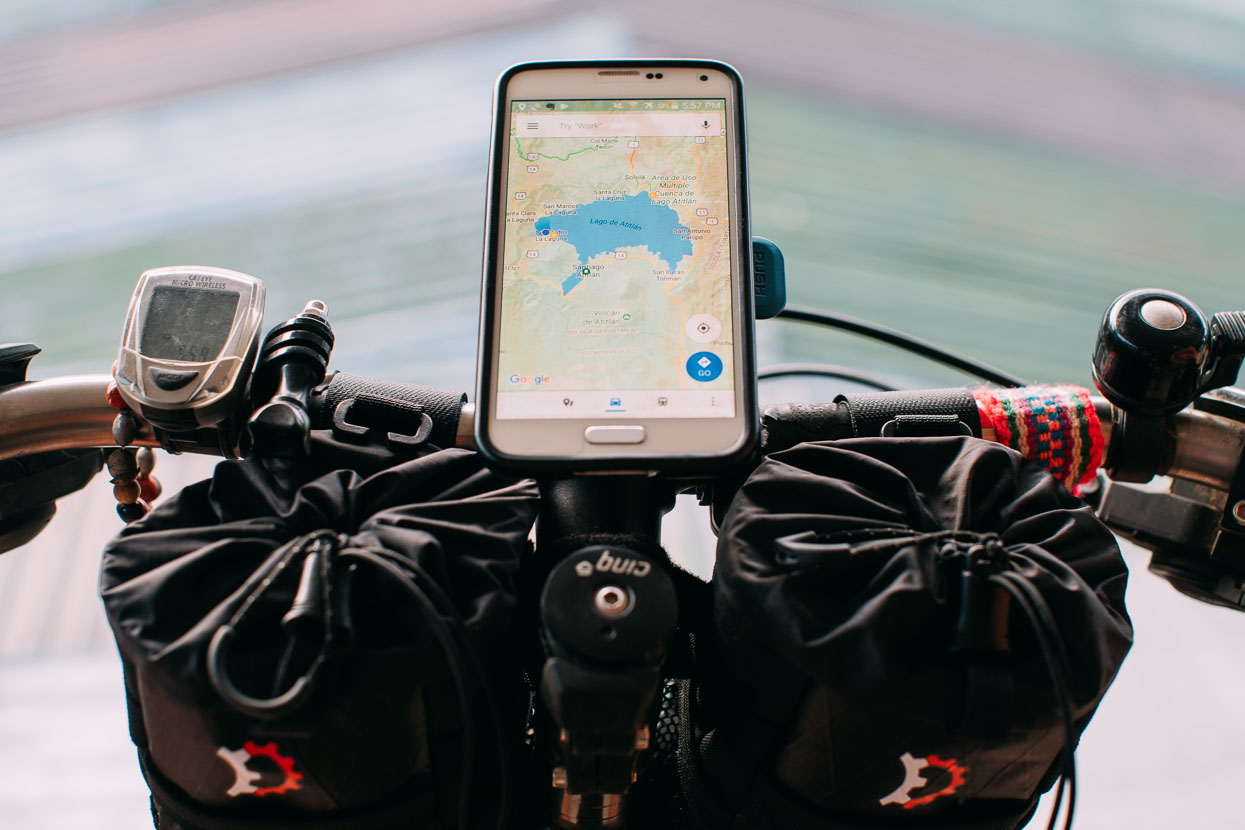
(2) The GPS function will still work while your phone is in flight mode. This is great because you can use your GPS with impunity without worrying about your phone dying in just a few hours. In flight mode and with power saving activated we get 2–4 days out of a single phone, depending on how much we need to refer to our map and GPX track. To mount our phones on the handlebars we use the versatile QuadLock system which is simple, strong and secure.
Phones are excellent for this purpose due to their large touch screens, clear displays and efficiency of input and control. However – after over a year of use on our handlebars our original phones took beating. Constant exposure to the sun started to burn in the display on the screens. The display on mine had yellowed significantly when I finally dropped and broke it in Guatemala (now replaced with a Samsung J7). I would not recommend using a phone as your principal navigation device for extended trips if it’s on your bars day in day out. For shorter trips (up to a couple of months) it’s fine. A couple of other things to note: if you’re mounting your phone on your bars I’d recommend a waterproof/dustproof model, or use a case that protects the phone reasonably well. Rain is an annoyance whether your phone is waterproof or not as moisture on the screen can make it go haywire.
Since Guatemala we have used a Garmin eTrex 20x on my handlebar for day to day navigation, following our planned GPX. Dedicated GPS units, while the screen is small and the interface is fiddly, do have two big advantages over phones for navigation: they’re battery efficient (i.e. two rechargeable AAs can last several days) and they’re completely waterproof.
You can download free OSM maps (whatever region/country you choose) for your Garmin device here.
Users of Garmin GPS riding in Mexico should be aware of the Mexico E32 Map from CartographiaGPS. These are the recommended maps for the Baja Divide and are very popular with motorcyclists. The E32 is extremely detailed when it comes to roads and tracks, but it can’t be used as a planning tool to create accurate tracks (although you can load an existing track into it of course), so we found it more useful for reference when in a navigational pickle if there was a problem with our preplanned GPX. At US$105 it’s expensive, but if you’re a Garmin user, well worth it.
Central America is well covered by the Cenrut map project which provides road coverage maps for both mobile phone and GPS (Garmin). For cyclists sticking mainly to the highways it’s useful, but our experience of it in CA is that many of the minor roads that we were interested in following were not covered. It is continuously updated though. Cenrut operates on a donation basis. To use the Cenrut maps with your phone you’ll need to download 7 Ways, but it’s not a great app. You’re better to run OsmAmd on your phone and if you’re carrying a GPS too, run Cenrut on that, or the free OSM Garmin maps (see above).
Recording Tracks
We are often asked which device we use to record our daily cycling route. Because track recording puts more demand on batteries (i.e. phone/GPS), since the start of this tour we have used a Bryton Rider 100 GPS bike computer. It’s a simple device that records your track as you ride, while providing current speed, average speed, odometer and max speed. It’s worked flawlessly everyday we have ridden and because the simple display is monochrome the USB-rechargeable battery lasts 2 full riding days – perhaps three if they are shorter days. The tracks are recorded as .FIT files which we convert to GPX and upload to Google My Maps to display our current route to-date.
Update: in southern Colombia the Bryton unit died (the USB socket pulled out of the back of it). We now record our daily track on the Garmin eTrex.
Conclusion
As I suggest earlier in this article there’s no one-fits-all solution to mapping and navigation for long distance back country cycling. The huge differences in map data from country to country mean that what might work well in one country doesn’t work in another, so your system might need to change as your journey progresses. While some maps might have you drawing the conclusion that an area you are about to ride into is unpopulated, reality on the ground can be entirely different. We’ve experienced this repeatedly in Latin America’s remoter areas. By utilising some of the tools I’ve mentioned, it’s possible to get off the beaten track, away from traffic and trash and visit places that have scarcely seen cyclists – if any. Even in these ultra connected, globalised times it’s possible to ride off the map and be the first person to do it. It made our day when we rode into a village in the mountainous Mexican state of Guerrero and an indigenous man said to us that we were not only the first cyclists to pass through there, but also the first gringos.
‘Thank you for visiting my village’, he said.
Article updated December 2018.
Further Resources
Long distance bikepacker Scott Pauker details his route planning process (which partly inspired our own) at Spoke and Words.
There are two excellent articles at Bikepacking.com: Using Your Smartphone as a GPS Unit, and Route Planning Guide.
To keep track of our Alaska to Patagonia route so far, check out our map.
We also update our location daily while on the move via InReach.
Do you enjoy our blog content?
We love it when people shout us a beer or contribute to our ongoing expenses!
Creating content for this site – as much as we love it – is time consuming and adds to travel costs. Every little bit helps, and your contributions motivate us to work on more bicycle travel-related content.
Thanks to Biomaxa, Revelate Designs, Hope Tech, Kathmandu and Pureflow for supporting Alaska to Argentina.
Creating a route in Google My Maps
1. Bring up Google My Maps.
2. Click the tab +Create a New Map.
3. Click the words Untitled Map at the top of the window and rename the map (i.e. Southern Mexico).
4. Click the menu to the right of the Untitled Layer drop down window and rename the layer (i.e. Oaxaca to Palomares).
5. Click the ‘inverted tear drop’ (Add Marker) and move the + sign to the start of the route and click and type in the name (& note if desired) of location (i.e. Oaxaca) and SAVE.
6. Add a second marker as your destination following the same procedure outlined in Step 5.
7. Then go to top of the window and click on the routing icon (Add Directions), another box will be added to the Southern Mexico window with the destination location (i.e. Palomares) in the B window.
8. Click in the A field and type in the origin, e.g. Oaxaca; as you start to type it will auto fill.
You now will see a route on the screen. At this point you can change the ‘transportation mode’ to ‘walking’. With your mouse hover over any spot on the route (blue line) and a black outline of a small circle will appear.
9. Click and Drag this circle to any new road, this will generate a new route (you can do this multiple times).
You can now do a number of additional steps (i.e. Add another Destination or generate a KML and EXPORT it for your navigation app or Google Earth).
10. To generate a KML, click on the menu to the right of your map title and select EXPORT TO KML, then Download and then Save File or Open with Google Earth).
Instructions courtesy Victor Borgogno. Note these instructions are for browser/desktop version only. Route modification is not available in the app version.


Very interesting read!!
Excellent information! Thanks kindly!
Superb stuff. Thanks for writing it up. We mostly use Gaia GPS and Trails.io apps. Gaia for overview, offline maps and planning. Trails for better location and detailed elevation information. We have a garmin Edge 520 on the bars. This is handy because via the ‘dynamicWatch’ app in the garmin App Store you can put the GPX route you’re following on the GPS via Bluetooth. I’m keen to give OSMAnd a try!
Thanks for sharing this Mark. Very helpful.
Hi Mark,
thanks for this excellent article. As a passionate mountainbiker I also use osmand a lot, especially for finding POIs and city tours. For outdoor touring I would like to recommend Oruxmaps or Locus in combination with the phantastic Openandromaps. These are based on Openstreetmap (OSM) as well but the appearance is themeable and gets very close to a printed TOPO map. For offline routing these apps can be combined with the “brouter” app to get e.g. elevation profiles of the planned route. All OSM based maps have their own update schedule, so it may be advisable to watch the respective map cycles.
As I am a OSM contributor as well, I would also like to invite all travelers to create an OSM account and to add travel knowledge (missing trails, POIs of any kind) that cannot be found on the map yet. This helps to improve this valuable source of information significantly.
Guido
Great information – I’ll check out OpenAndroMaps for sure. Thank you Guido.
Hi Mark, I am finding your travel images truly inspirational to the point where I am planning a visit to find those boats made of bits of old aircraft in Laos. Can you remember where you took that image? I’d love to go there and take a ride in one.
Happy travelling,
Kev Lee
Hi Kev. Slow reply sorry… but the photo that shows two boats under the bridge was taken in Nam Theun. Generally anywhere along the rivers in Bolikhamsai you should see them. An interesting area is the road from Nongchan to Boualapha, there is a lot of war scrap in the villages there, some bomb boats and it’s quite remote. I think since we rode through in 2011 some bridges have been built, but back then it was all little motorbike ferries.