Angkor: just the mention of the word invokes thoughts of mysterious jungle clad temples and an age of phenomenal vision and architecture. The Khmer Empire’s 1000 year old legacy at Angkor is an incredible one and draws millions of visitors to Cambodia every year, with good reason: Angkor’s temples are among the most amazing man-made creations in the world (in fact looking at them it’s sometimes hard to believe they were made by man) and the variety there is huge: from the stately and imposing Angkor Wat itself to the rambling, jungle covered Ta Prohm to the ‘temple mountains’ like Bakong and the mind bending Bayon. There’s something for every temple fan and indeed way too much to take in on a short visit.
The conundrum of what to see and when has baffled visitors since ‘tourism’ started here in the early late 19th century and aside from this article there are some useful resources to help you work out a plan. They’re listed at the end of this post.
I’ve written this article for photographers and cyclists who are keen to get the most out of their 3 day pass. We used a mix of our own bikes (you can hire them easily too) and tuk tuks to get around. This worked really well and gave us good flexibility, as well as saving a bit of money. Bicycles are a great way to get around at Angkor and the roads are flat and very good quality, so you can get around quickly (it’s about 8km from town to Angkor Wat). We were there wet season, which is great for seeing the barays (ancient reservoirs) full and the jungle lush and green, but there are less striking sunrises and sunsets (though we still got awesome light one morning and evening). If you want iconic sunset and sunrise shots, come in the dry season.
Seeking solitude at the temples, the best tree roots to photograph and better light? Read on…
Tickets for the Angkor Temples are purchased from the ticket booth on the main road to the temples from Siem Reap. You can get passes for 1 day, 3 days, and 5 days. The 3 day pass costs US$40 and can be used on 3 days out of any 5 day period. Tip: if you buy your pass in the late afternoon, you can use it after 5pm for a bonus visit to catch a sunset before starting your three days proper the next day.
Evening (after arrival in Siem Reap)
We caught a tuk tuk from our hotel, bought our pass at 5pm, and stopped off at Angkor Wat – the biggest, most famous, and stateliest of the temples – for a quick look around as the sun set. Angkor Wat is huge and justifies a few hours to see it properly. We had enough time to wander down the awesome entrance causeway and photograph some carvings and pillars in the first couple of compounds. This quick evening visit was a good way to satisfy our initial curiosity and get the vibe of the place, as well as our bearings for a pre-dawn start the next morning.
Day 1: Sra Srang, Ta Prohm, Banteay Kdei, Bayon
We were up at 4.30 and biking to the temples by 5am to catch the sunrise at Sra Srang, a huge baray. It’s kinda the ‘second option’ sunrise spot that gets you away from the mad crowds at Angkor (we’d check that one out another day). It’s a cool and serene spot, but doesn’t give you a temple to silhouette. The day dawned grey for us though and so once it was reasonably light we headed over to Ta Prohm – one of the famous ‘jungle temples’ – only a short bike ride away. This is one of the spots where Tomb Raider scenes were filmed. It’s an absolutely atmospheric and magical spot and being there shortly after 6am we had it entirely to ourselves for the first hour or so (Yes, it is possible to escape the crowds!). There are crumbling ruins, carvings and tree root-wrapped temples to shoot here, all under a canopy of lush jungle. Tip: overcast days are best for photography under jungle cover as clear days bring too much dappled light and contrast onto your subjects.
After a couple of hours at Ta Prohm we headed over to Banteay Kdei which was also still quiet. This temple’s got a stunning entrance gate, lots of awesome detail to photograph and many apsara carvings.
Around 11am we biked back to Siem Reap, had lunch and napped for an hour before heading back out in a tuk tuk for an afternoon fix at Bayon. This is the number one trippy temple and one of the absolute must-sees of the area. It’s quieter in the afternoon too. The temple’s on several levels, with giant buddha faces carved into its 37 standing towers as well as extensive and detailed scenes carved into its walls. We got a couple of hours here before the afternoon thunderstorm called a halt to photography and we scooted back to the hotel. On clear days Bayon’s multiple towers catch good evening light as the sun slowly sinks behind the trees.
Day 2: Angkor Wat, Angkor Thom, Bayon, Bakong (Roulos Group)
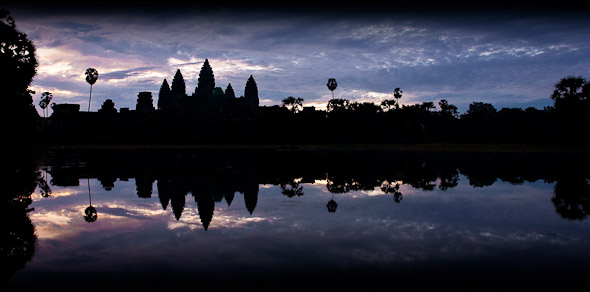
Another 4.30am start to catch the iconic sunrise at Angkor Wat. This is the classic ‘sight’ to see at the temples and you’ll be joined by up to a 1000 other people depending what time of the year you’re there. Being another grey dawn the sunrise didn’t blow our minds, but you can still catch the classic Angkor silhouette/relection shot over the north pond. Most of the tour groups return to Siem Reap for breakfast so Angkor’s reasonably quiet after sunrise. We wandered around the complex absorbing the scale and detail. It’s a starker temple than the likes of Ta Prohm and Bayon and in some ways harder to photograph. This day we used our bikes all day, and next stop was the classic entrance gate to Angkor Thom (a famous, imposing gate with the same style buddha heads as Bayon). Tip: Angkor Thom has gates on 4 sides; the South Gate is the best restored, but a tourist trap, while the East Gate is much quieter and junglier.
Inside Angkor Thom there are several temples and carvings to check out, notably (apart from Bayon) Phimeanakas, Baphuon, Terrace of Elephants and Terrace of Leper Kings. We battled on and off downpours while checking this stuff out and it was getting a little late for good light so we chilled out for a couple of hours to eat lunch and wander around inside Angkor Thom. In the mid afternoon we biked back to Siem Reap and then I headed out to the Roulos Group on my bike (about a 13km ride) to see Bakong, one of the ‘temple mountains’ in the Mayan style. It’s a striking pyramid surrounded with ornate brick towers and is very photogenic. Being further from Siem Reap it’s quieter too. There’s a wat nearby, so monks congregate at the temple late afternoon and it’s a perfect sunset spot. From 4pm onwards I was one of only three tourists there, with a few monks to keep us company!
Day 3: Banteay Srei, Banteay Samrei, Pre Rup, Ta Som, Preah Khan
This was our last day in the Angkor area so we planned a big one, with the best temples for photography bookending the day. We had lots of ground to cover so booked a tuk tuk driver for the whole day (US$25), and left at 4am for Banteay Srei, an hour away, to catch the sunrise. We ate our breakfast in the back of the tuk tuk on the way out. Light floods nicely onto this temple at dawn and the towers here contain the most detailed and incredible carvings we saw at Angkor. Tip: the guards will let you through the barriers for a closer look, just remember to tip them afterwards. Again, we had this place to ourselves for two hours before another tourist showed up, by which time the light was bright and the place had lost most of its exotic magic.
Next stop was the Landmine Museum, just down the road. It’s a worthwhile curiosity if you’re into that sort of thing and tells the story of a Cambodian man who joined the Khmer Rouge as a boy soldier, then defected to the Vietnamese Army and went on to become Cambodia’s number one anti-landmine campaigner and maverick landmine removal expert. There’s lots of ordnance on display and insights into Cambodia’s landmine problem. He also runs an orphanage and school for disadvantaged children.
By now it was getting too bright for photography and the temples busier so we checked out the more minor, but still spectacular, sights of Banteay Samrei (a baray-style temple) and Pre Rup (temple mountain). Mid afternoon it clouded over nicely so we headed to Ta Som where a very photogenic tree and root system completely covers one of the gates – it’s another must see.
Saving one of the best for last we finally explored the huge and rambling Preah Khan which rolls all the best things of Angkor into one temple: striking architecture and grandeur, collapsed ruins and tree-root-covered walls, maze-like corridors, carvings and block-choked passageways. It was probably our favourite temple and we spent at least 2 hours exploring and discovering different structures and details to photograph. A memorable way to finish. Beyond Angkor we went on to ride further north-east through Cambodia and visit Beng Melea, Koh Ker and Prasat Preah Vihear, but they will be the topic of the next post…
Note: I don’t proclaim to be an instant expert on Angkor Wat! The aim of this article is to pass on what I learned and help people form a plan to maximise their visit.
The basis for my itinerary came from this useful article by Andrew E.
Useful Publications
The Siem Reap Angkor Visitors Guide is a very useful booklet with full temple descriptions and maps, their website has a huge amount of info too. You can pick up the booklet for free at hotels in Siem Reap.
The classic 1944 illustrated guide with maps is available here.